
Lightspeed
In this section we will explain the steps needed to connect your account to Lightspeed.
Information
| Summary | |
|---|---|
| Available payment methods | eCommerce: all online payment methods POS: offline/instore payment methods |
| Name | Lightspeed | e-Commerce platform | App | Hosted Solution |
| Download location | App store |
| Refunds | Via Lightspeed backoffice or My.pay |
| Multi-store | Yes, you can configure an SL-code per app per domain |
| Instore | Yes - pin processing only. No real-time transaction insights. Giftcards and QR payments are not supported. |
| Payment filters | Min/max amount | country | B2B/B2C | shipping method |
| New payment options | Automatically (no update required) |
Set-up
Installation & configuration
You can easily install the app via your Lightspeed backend. Have your credentials ready.
- Click here and hit Install
- Select the webshop you would like to add the app to (login if needed)
- Click on Go to App to configure the app
- Select the Shop ID you would like to configure and fill in the following details:
- Service-ID (SL-xxxx-xxxx)
- API-token (a3e314ee...)
- Click Save to load all payment methods activated in your sales location
- To enable a specific payment method, double click the logo under Payment Method.
- Configure your plugin and click the Save button to save your changes
NB: you can always access the app via Purchased Apps > Go to App
Additional app settings
You will see another menu below called Settings:
Testmode
Enable this option to start all transactions in sandbox mode, without making any real payments.
Cancel order after cancelling payment
No (default) - after cancelling a payment method, the enduser can complete the transaction with an alternative payment method
Yes - order will be cancelled when the payment is cancelled
Refund
Determines which orderstate an order should have after a refund.
Auto-refund
Enable auto-refund. Select which action should trigger a refund:
No - no refund initiated
Yes - on product return
Yes - on credit invoice
Yes - both ways
Auto-Capture
Enable this setting to automatically capture authorised payments (generally Buy Now Pay Later orders) when a shipment is created.
Save order-id at note
After a completed payment, the Pay.-orderID can be added to the note-field of your Lightspeed order for reference.
Translations based on
Checkout country - payment screens will open in the same language as the checkout country
Webshop language - payment screens will open in the same language as the webshop language
Image style
Newest (default) - ensure you always have the latest brand icons in your checkout
Classic - older styles for the brand icons. This was introduced for a transition period. Please ensure you use the "Newest""setting.
Language of payment screen
Order - payment screens will open in the same language as the order
Webshop language - payment screens will open in the same language as the webshop language
2. Payment methods
Payment methods
List of available payment methods, as activated in your Sales Location.
Coloured - payment method is activate in Lightspeed
Greyed out - payment method is disabled in Lightspeed. Double click the brand icon to activate.
Releases
Not applicable; Lightspeed is a hosted solution. You do not need to install external software. Simply connect to the app (which is hosted by Pay.) and you are ready to go.
Features
Refunds
Auto-refunds
There are 2 ways to process a refund. Please check your auto-refund settings (as described in the Set-up chapter under Additional app settings).
1. Refund via credit invoice
- Go to Orders and select the order you would like to refund by clicking the order ID
- Click on Add a credit invoice
- Select the amount you would like to refund, ensure the Status is Not Paid
- Click Add
In the order notes, you will see the message "Auto-refund success". It will be delayed for 5 minutes in case you need to make any changes.
Keep in mind: canceling a paid order in the Lightspeed admin will also create a credit invoice and thus will trigger the auto-refund process.
2. Refund via product return
- Go to Orders and select the order you would like to refund by clicking the order ID
- Click on Create Return
- Select the products you would like to return, ensure the Status is Return Authorized
- Click Add
In the order notes, you will see the message "Auto-refund success". It will be delayed for 5 minutes in case you need to make any changes.
Type store
If you are using an Omnichannel store, please ensure to set the following setting to "eCom. Omnichannel" to ensure refunds are processed correctly.

eCom. Standaard: we check the status of the invoice (paid or not paid). Based on this field, we create the refund (or cancel the refund).
eCom. Omnichannel: an omni-store always returns a "paid" status. So for the Omnichannel setups, we have removed the check on the status field and always create one.
Capture (BNPL)
When you offer Buy Now Pay Later payment methods in your checkout, the idea is to invoice your customers after they have received their products or services.
Example:
customer places order > transaction status is AUTHORIZED > webshop ships the product(s) > CAPTURE is created
In this app, it is possible to automate this flow.
Under Apps > Purchased Apps > select Pay > Go to App you will find the Auto-capture settings.
Enable this setting to automatically capture authorised payments (generally Buy Now Pay Later orders) when a shipment is created.
Shipping methods
To ensure a smooth and secure customer experience, some shipping methods—such as parcel lockers and pick-up points—may not be compatible with Buy Now Pay Later (BNPL) payment options. You can configure exclusions for these combinations within the multi-step checkout flow only by following the steps below:
-
Go to Apps > Purchased Apps > select Pay > Go to App > Filter by shipping methods under Settings
-
Set Filter by shipping methods to Yes

-
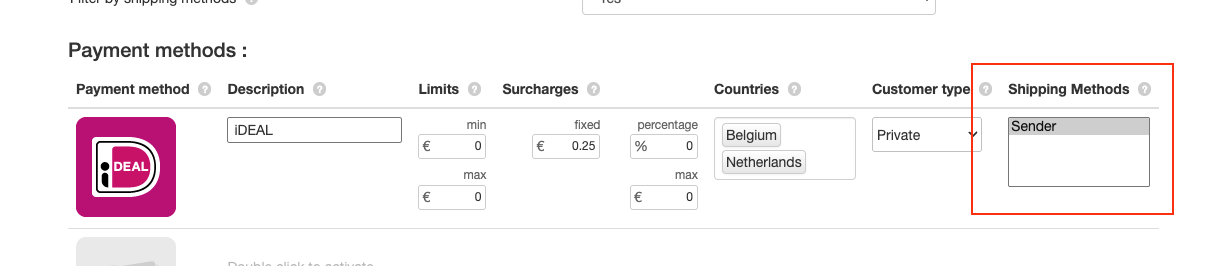
Once enabled, go to each payment method and specify which shipping methods should be excluded using the far-right column.
In this example, when PostNL Pakketautomaat is selected in the checkout, Billink will not be shown as an available payment method.
Paylink
It is possible to add a payment link to an email template, for example a payment reminder. A paylink can be added to each template with the ordernumberid available. Below we will show you how.
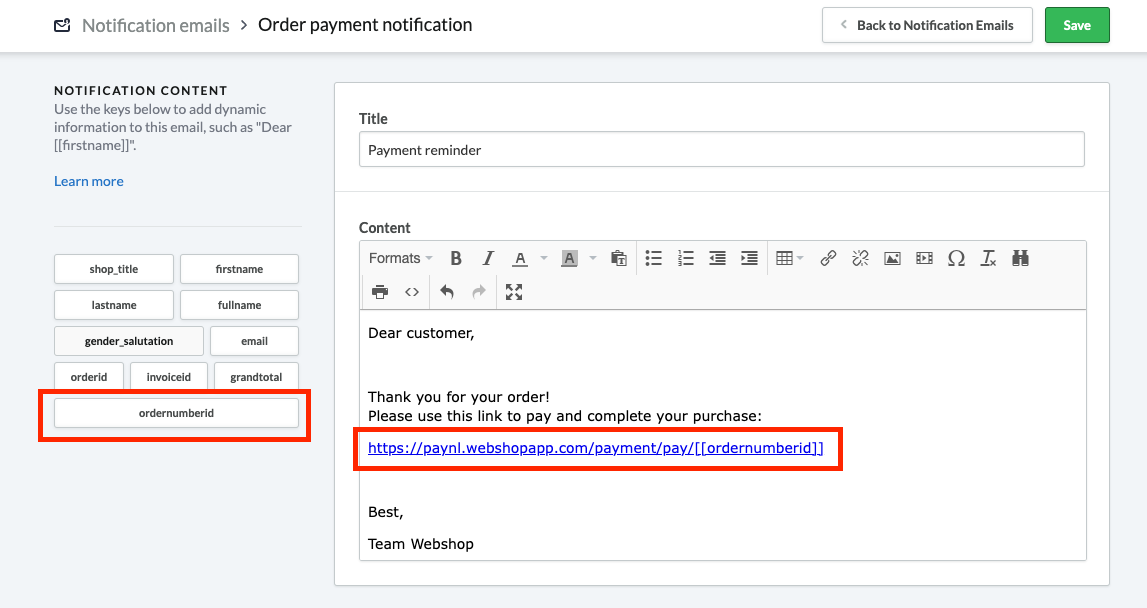
- Go to Settings > Notification Emails > Order payment notification
- Enter the relevant text. For the paylink, use the following format for the URL
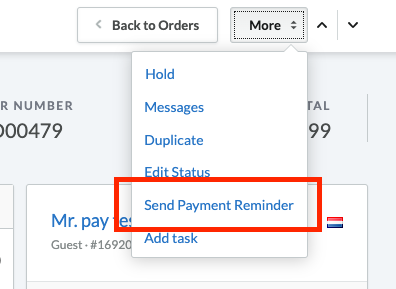
https://www.example.com/payment/pay/[[ordernumberid]]. Replace https://www.example.com with your own URL - To send a payment reminder, go to Orders > select an Order > More > Send Payment Reminder
Example Paylink
Ensure the ordernumberId is added to the email template, like so:
A paylink will then be added when sending out Payment Reminders:
Instore
It is possible to connect a card terminal to the Lightspeed POS for transaction processing only. See this Lightspeed page for instructions. The instore transactions will be started from the POS, not the Pay. API. These transactions will be visible in Reports / Management and Reports / Paid transactions when we have received the monies.
Transactions can be paid out the day after, depending on your pay out (clearing) frequency.
Business Orders
Certain payment methods, like Biller, can only be used with B2B orders. We recommend enabling the following settings if you are processing B2B orders:
- Go to Apps > Purchased Apps > click on Pay. > Go To App
- Set Auto-capture to Yes
- Go to your B2B payment method and set Customer Type to Business
- Go back to Checkout > Configuration > Additional customer fields > Edit
- Configure these settings. For B2B orders a Company name or COC numberis generally Required.
Error Message Definitions
| Error Code | Description | Possible solution |
|---|---|---|
| PAY-LIGHTSPEED-101 | We can't find your shop. | Please contact Pay. |
| PAY-LIGHTSPEED-102 | App can't connect to Lightspeed. | Check your connection. |
| PAY-LIGHTSPEED-103 | Entered credentials are incorrect. | Check your API-Token and Service-Id (SL-XXXX-XXXX). |
| PAY-LIGHTSPEED-104 | We can't find your shop. | Please contact Pay. |
Filter payment methods based on shipping method
We have added an optional setting named "Filter by shipping methods". When enabled, you can select which shipping methods to exclude for each payment method.
To enable this setting, go to:
-
Apps > Purchased Apps > click on Pay. > Go To App
-
Set Filter by shipping methods to Yes
-
A new column Shipping methods is added to each payment method.
NB: the payment method will not be shown in checkout for each selected shipping method.
Order overview
This feature introduces a dedicated refund (orders) overview within Lightspeed that allows users to view all refunds, inspect their statuses and identify failed refunds along with detailed error messages. The primary goal is to improve visibility and troubleshooting of refund-related issues.
To open this overview, navigate to:
-
Apps > Purchased Apps > click on Pay. > Go To App
-
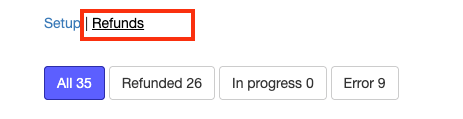
Next to setup at the top, select Refunds
-
Here you can select:
- All: displays all refunds, regardless of their current status.
- Refunded: displays refunds that have been successfully completed, including their final status.
- In progress: displays refunds that are currently open and awaiting processing.
- Error: displays refunds that have failed including error messages.
Translations
Translations are managed via 2 settings:
- Translations based on:
- Checkout country: country as selected in the checkout
- Webshop language: language the customer is viewing the shop in
- Language of payment screen:
- Order language: based on delivery address country
- Webshop language: language the customer is viewing the shop in
Payment method settings
It is possible to change a few settings via Apps > Purchased Apps > click on Pay. > Go To App
- Description: name as shown in checkout
- Limits: optional. Set the minimum and/or maximum amount to show this payment method. When both are
0the method will always be displayed. - Fees: optionally set the payment costs for a payment method. Choose a fixed amount or a percentage.
- Countries: select in which country the payment method should be available. No selection means available in every country.
- Customer Type: select for which customer type the payment method should be available.
Sorting your payment methods in checkout
To change the order in which the payment methods are shown in checkout:
- Go to Apps > Purchased Apps > click on Pay. > Go To App
- Drag & drop the payment methods as you wish
Updated 21 days ago