
WooCommerce
Information
| Summary | |
|---|---|
| Available payment methods | All (online & offline) |
| Name | WooCommerce | e-Commerce platform | Plugin |
| Download location | Pay. GitHub or WordPress App Store |
| Refunds | Via WooCommerce backoffice or My.pay |
| Multi-store | Yes |
| Instore | Yes |
| Payment filters | Min/max amount | country | B2B/B2C |
| New payment options | Plugin update + reload configuration |
| Requirements | WooCommerce 3.0.0 and higher WordPress 3.5.1 and higher WooCommerce Blocks |
Set-up
Installation
You can easily install the plugin via your WooCommerce/WordPress backend. Have your credentials ready.
- Login to your WooCommerce/WordPress backend
- Go to Plugins > New Plugin
- Type paynl in the search bar to find the plugin Pay. Payment Methods for WooCommerce
- Click on Install
- The plugin will now install itself, once completed click on Activate
Manual installation instructions
There are two ways to manually install the plugin. Via uploading a zip file in the WooCommerce/WordPress admin, or via FTP. The choice is yours:
Via upload
- Download the latest version of the plugin on GitHub
- Go to Plugins > New Plugin
- Click on Upload plugin (top left) and upload the .zip file you downloaded in step 1
- Select Install Now
- The plugin will now install itself, once completed click on Activate
Via FTP
- Download the latest version of the plugin on GitHub
- Open the .zip file and copy the contents to the folder wp-content/plugins
- Go to Plugins > Installed Plugins and Activate the plugin here
Update instructions
You can update the plugin in 2 different ways, depending on your installation method.
- Installed automatically
- Go to Plugins > Installed plugins
- If there is a message that a new version is available, click on Update Now
- (Optional): on this page you can also enable Auto-updates. The plugin will then automatically update itself whenever there is a new version available
- Installed manually
- If you have installed the plugin manually, repeat the steps of your installation method
Configuration
Now you have installed the plugin, we can connect it to your Pay. account to start accepting payments. Here we show you how. Have your credentials ready.
- In the WooCommerce/Wordpress backend, open the plugin via:
WooCommerce > Settings > Pay.
or
Plugins > Installed plugins > Settings - Fill in the following details:
- Token-Code (AT-xxxx-xxxx)
- API-token (a3e314ee...)
- Service-ID ((SL-xxxx-xxxx))
- Select Save changes to load all payment methods activated in your sales location
- Configure your plugin and click the Save button to save your changes
Additional plugin settings
You will see 3 other menu's:
1. Payment methods
List of available payment methods, click on a payment method to set it up. All payment methods activated in Pay. will be shown in this menu. The green tick behind a payment method shows whether it is also activated in WooCommerce.
2. Settings
Standard Pay. Style
Use a preset style in your checkout, with the payment method titles on the left and the icons on the right.
Payment screen language
Select the language in which payment screens open (such as the Credit Card screen or Bank Transfer page). Note: the language can also be changed from the payment screens.
Processing Refunds
Process refunds that are initiated from the Pay. admin portal.
Auto-capture
Off - no auto capture
On - automatically capture payments with the status AUTHORIZE when an order is set to "Complete"
Order data
Enable this when you are using Buy Now Pay Later payment methods. It will send enduser and productdata for better insights and payment processing.
Show VAT number
Choose to show a VAT number field in the checkout.
Show COC number
Choose to show a Chamber of Commerce number field in the checkout.
We recommend making this a required field for business payment methods.
Use High Risk payment methods
Enable this option if you are using High Risk payment methods (mainly for Credit Cards).
Extended logging
Log payment proces information. You can view this via WooCommerce > Status > Logs.
SSL Verify Peer
Enable when you are experiencing SSL certificate problems and don't know how to solve them.
Alternate exchange URL
Use your own exchange-handler. Requests will be send as GET.
Example: https://www.yourdomain.nl/exchange_handler?action=#action#&order_id=#order_id#
Failover gateway
Leave empty, unless specifically asked by Pay. to fill in an alternative URL provided to you.
Order prefix
Optionally add a custom order description prefix. Use a double underscore to add an extra space.
Track payment method
If enabled, the order will be updated with the actual payment method used (which can change in the checkout proces).
3. Order state automation
Set which order status you want to give to certain Pay. statuses.
You have now successfully connected your Pay. account to WooCommerce
Releases
Features
iDEAL Fast Checkout
This feature allows you to show a fast checkout button on the cart page, minicart and/or product page. This way a customer can pay for their items with just one click. Address details are added to the order via their iDEAL profile.
To activate this:
-
Navigate to Plugins > Settings (under Pay. Payment Methods for WooCommerce) > Payment Methods > iDEAL
or
Settings (under WooCommerce) > Payments > Pay. - iDEAL
and scroll down to the Fast checkout section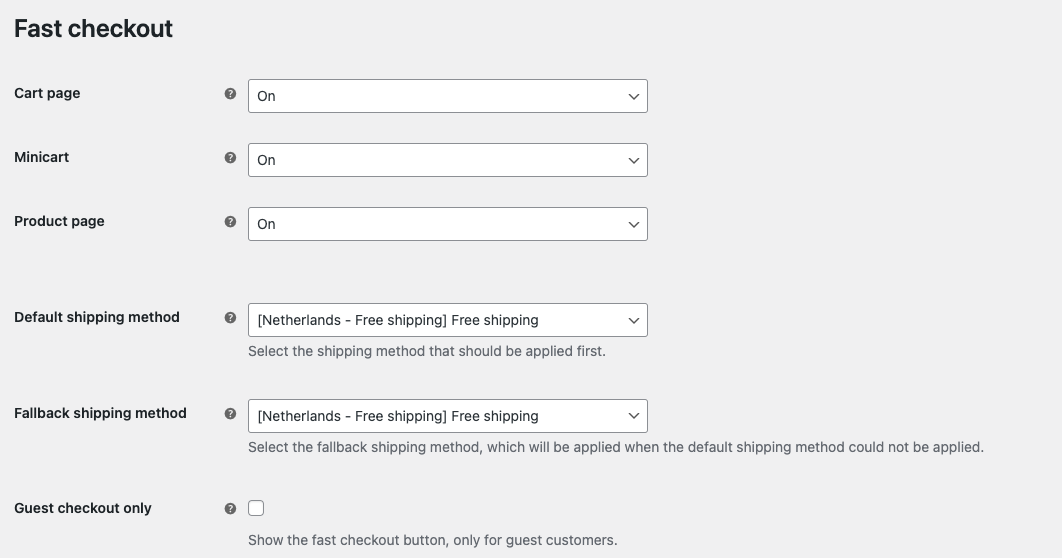
-
Select where to show the button
-
Cart page on/off

-
Minicart on/off

-
Product page on/off

-
-
For shipping, select the following:
- Default shipping method (for example, free shipping) - select the shipping method that should be applied first
- Fallback shipping method (for example, fixed fee) - this method will be applied when the default shipping method is not available
-
Additional options:
- Guest checkout only (on / off)
Show the fast checkout button, only for guest customers
- Guest checkout only (on / off)
-
Save your changes by selecting Save changes
Refunds
- In the WooCommerce/WordPress backend, go to WooCommerce > Orders and select the order you would like to refund
- Scroll Down to the Product section and click on Refund
- Select the products you would like to refund and possibly restock and select Refund €xx,xx via PAY. - Visa Mastercard
The amount to refund will automatically be adjusted based on the products and quantity you select - A pop up will appear checking if you are sure you want to process the refund, as this cannot be undone. If you are sure, select OK
Capture (BNPL)
When you offer Buy Now Pay Later payment methods in your checkout, the idea is to invoice your customers after they have received their products or services.
Example:
customer places order > transaction status is AUTHORIZED > webshop ships the product(s) > CAPTURE is created
In this plugin, it is possible to automate this flow.
Under WooCommerce > Settings > Pay. > Instellingen you will find the Auto-capture settings.
Enabling auto-capture and/or auto-void:
Auto-capture: when enabled, the plugin will automatically send a capture (payment) notification to Pay. when the order status changes to 'Completed'. This applies to transactions in state AUTHORIZE.
Auto-void: when activated, the plugin will automatically void a transaction in Pay. when the order status is changed to 'Cancelled'. This applies to transactions in the state AUTHORIZE.
Paylink
WooCommerce has their own paylink ability built in so you don't have to use the function we provide.
Here are the steps you have to follow to send such a link to your customer.
- In your WooCommerce/WordPress admin, go to WooCommerce > Orders
- On the top left of the page click on Add order
- Create the order and enter customer information. Make sure to enter a valid emailaddress to send the paylink to
- On the top right under Order actions choose Email invoice / order details to customer
- Click on Create to finish making the order and to send it to the customer
The customer will receive an email with the order and paylink. They can select all the payment methods you have activated in your webshop.
Instore
- Go to WooCommerce > Settings > Pay. > Payment methods
or
Plugins > Installed plugins > Settings > Payment methods
or
WooCommerce > Settings > Payments - Select PAY. - Pinnen (Instore)
- Ensure it is enabled by ticking the select box
- Down at Selected terminal, select one of the following:
- Choose during checkout
_The customer can select a terminal during checkout, the selection is not saved - _Choose during checkout and save in cookie
_The customer can select a terminal during checkout, the selection will be saved - _Terminal selectie
_Select your terminal. This terminal is always called for a pin transaction, the customer cannot select a terminal in the checkout
- Choose during checkout
Business Orders
Certain payment methods, like Biller, can only be used with B2B orders. We recommend enabling the following settings if you are processing B2B orders:
Show VAT/COC number
In the Pay. settings of WooCommerce it is possible to add VAT and/or COC number fields to the checkout.
Payment method businesses only
When setting up a specific payment method, you can choose to make the payment method only visible to businesses. If the payment method is only suitable for business orders, choose the option Businesses only at Customer type.
When a customer enters a company in the address details when ordering, this payment method will be displayed.
Translations
Translations for the front end are not managed in the plugin, but via WooCommerce. Ensure to download a Translation tool that suits your needs and add translations for payment methods there.
Multicore
To limit the impact of a Single Point of Failure (SPOF), we make it possible to use multiple cores in our WooCommerce plugin. We will explain here how:
- In your WooCommerce admin, go to Plugins > Installed Plugins > Settings (under Pay. Payment Methods for WooCommerce)
- The plugin now opens. Select the third tab from the left *Settings
- Under Advanced Settings next to Multicore you will see a dropdown. Choose between:
- Pay.nl (Default) - this is the GMS API (rest-api.pay.nl) and is selected by default
- Achterelkebetaling.nl - this is a TGU and can be used when the GMS is unavailable
- Payments.nl - this is a TGU and can be used when the GMS is unavailable
- Custom - set your own URL, in the format https://customgateway.nl
NB: the alternative cores can be used for starting transactions and retrieving their status only.
- Click Save changes to save your changes
Find the right tab:

And simply select an option from the dropdown menu:
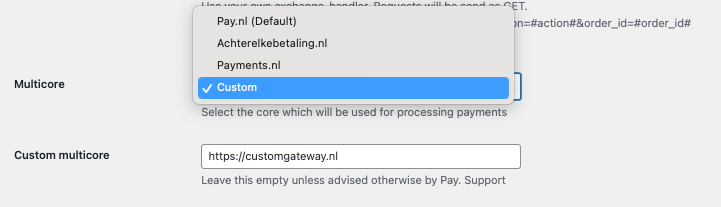
The idea behind the multicore is that your transaction processing is never interrupted. The multicore is, therefor, available for the endpoints transaction::start and transaction::info/status only. Non-essential processes (like the getService, refunds etc.) can continue once any disruptions have cleared.
Payment method settings
It is possible to change a few settings via WooCommerce > Settings > Pay. > Payment methods > [select a payment method]
- Enable/disable: if the box is ticket, payment method is active and shown in checkout. Leave it unticked, and the payment method will be disabled and therefor not show in the checkout.
- Title: name as shown in checkout
- Customer Message: description for the payment method as shown in checkout
- Instructions: instructions that will be added to the thank you page (for example for bank transfer)
- Minimum/maximum amount: select the minimum and/or maximum order total to offer this payment method
- Customer type: select for which customer type you would like this payment method to be available
- Country: select in which countries you would like the payment method to be available
- Bank selection (iDEAL only): off (customers will be redirected to the bank page to select their bank), selectbox (dropdown with names only) or radio buttons (names + logos)
- Authorize status (selected payment methods only): select which status authorized transactions initially should have. Select
Use defaultto use the global setting. - Request date of birth (selected payment methods only): show a date of birth field in checkout which is optional
- Require date of birth (selected payment methods only): show a date of birth field in checkout which is required
- Use the same invoice address as shipping address (selected payment methods only): only enable this option when the shipping address is not transferred correctly to Pay. for your Buy Now Pay Later payment methods
- Alternative exchange URL (selected payment methods only): use this URL for when the paymentstatus is (still) pending/ payment after payment finish.
- Selected terminal (instore only): select a default card terminal or let the customer select a terminal themselves in the checkout via a dropdown list
Sorting your payment methods in checkout
To change the order in which the payment methods are shown in checkout:
- Go to WooCommerce > Settings > Payments
- Drag & drop the payment methods as you wish