
Prestashop
In this section we will explain the steps needed to connect your account to Prestashop.
Information
| Summary | |
|---|---|
| Available payment methods | All (online & offline) |
| Name | PrestaShop | e-Commerce platform | Plugin |
| Download location | Pay. GitHub |
| Refunds | Via PrestaShop backoffice or My.Pay |
| Multi-store | Yes |
| Instore | Yes |
| Payment filters | Min/max amount | country | B2B/B2C |
| New payment options | New payment methods: no action required For plugin updates: update required (upload new version) |
| Requirements | PrestaShop 1.7 PrestaShop 8 PrestaShop 9 (plugin version 5.2.1 and upwards) |
Set-up
Installation
- Download the latest release from GitHub
Make sure to downloadpaynlpaymentmethods_x.x.x.zipand not the source code - Go to Modules > Module Manager and select Upload a module at the top right hand corner
- Select the ZIP file you have just downloaded, PrestaShop will automatically start uploading it
- When done click Configure
- The plugin is now visible under Modules > Module Manager > Payment > Pay.
Configuration
Now you have installed the plugin, we can connect it to your Pay. account to start accepting payments. Here we show you how. Have your credentials ready.
- In the PrestaShop backend, open the plugin via Modules > Module Manager > Payment > Pay.
- Fill in the following details:
- Token-Code (AT-xxxx-xxxx)
- API-token (a3e314ee...)
- Service-ID ((SL-xxxx-xxxx))
- Select Save changes to load all payment methods activated in your sales location
- Configure your plugin and click the Save button to save your changes
Advanced plugin settings
Most settings are explained in the plugin itself.
We will pick out a few options that might require more explaining.
Use a unique cart-ID per payment
When enabled, every transaction will receive its own unique cart-ID. Careful: this could impact modules that use the original cart ID or in rare cases stock management. Use wisely.
Order Create
This setting is useful for payment methods, like PayPal, where the status of a successful transaction is delayed. For example, when it is being verified.
Create order on succes (default) - order is created when the payment has been received (new_ptt) or when it is in the status authorise
Create order on payment start - order is added to PrestaShop when a transaction is started
NB: this means an order can be cancelled at a later stage (for example when the transaction gets rejected by the payment option)
You have now successfully connected your Pay. account to PrestaShop
Releases
Features
Refunds
It is possible to refund both on amount and on product level. Both partial and full refunds are supported.
Refund based on AMOUNT
-
In the PrestaShop backend, go to Orders > Orders
-
Open the Order you want to Refund, either by clicking on it or selecting View (looking glass)
-
Scroll down to the Pay. section, fill in the amount you would like to refund, and select Refund

-
A pop-up will appear to confirm the Refund. Select OK to process the Refund

-
Refresh the page to see the latest payment status. If the refund has been added successfully you will see "Successfully refunded €[amount]"

Refund based on PRODUCT
-
In the PrestaShop backend, go to Orders > Orders
-
Open the Order you want to Refund, either by clicking on it or selecting View (looking glass)
-
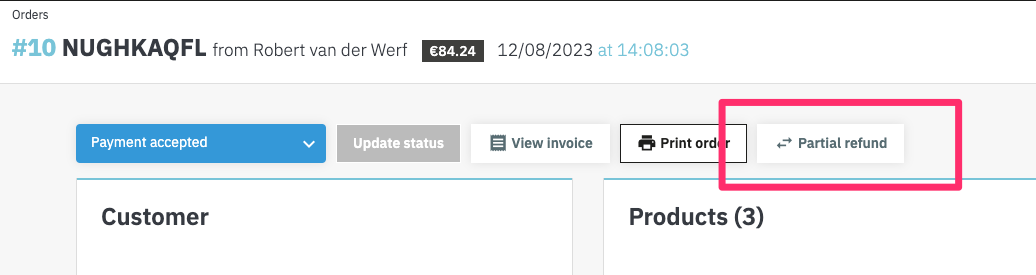
Click on Partial refund
-
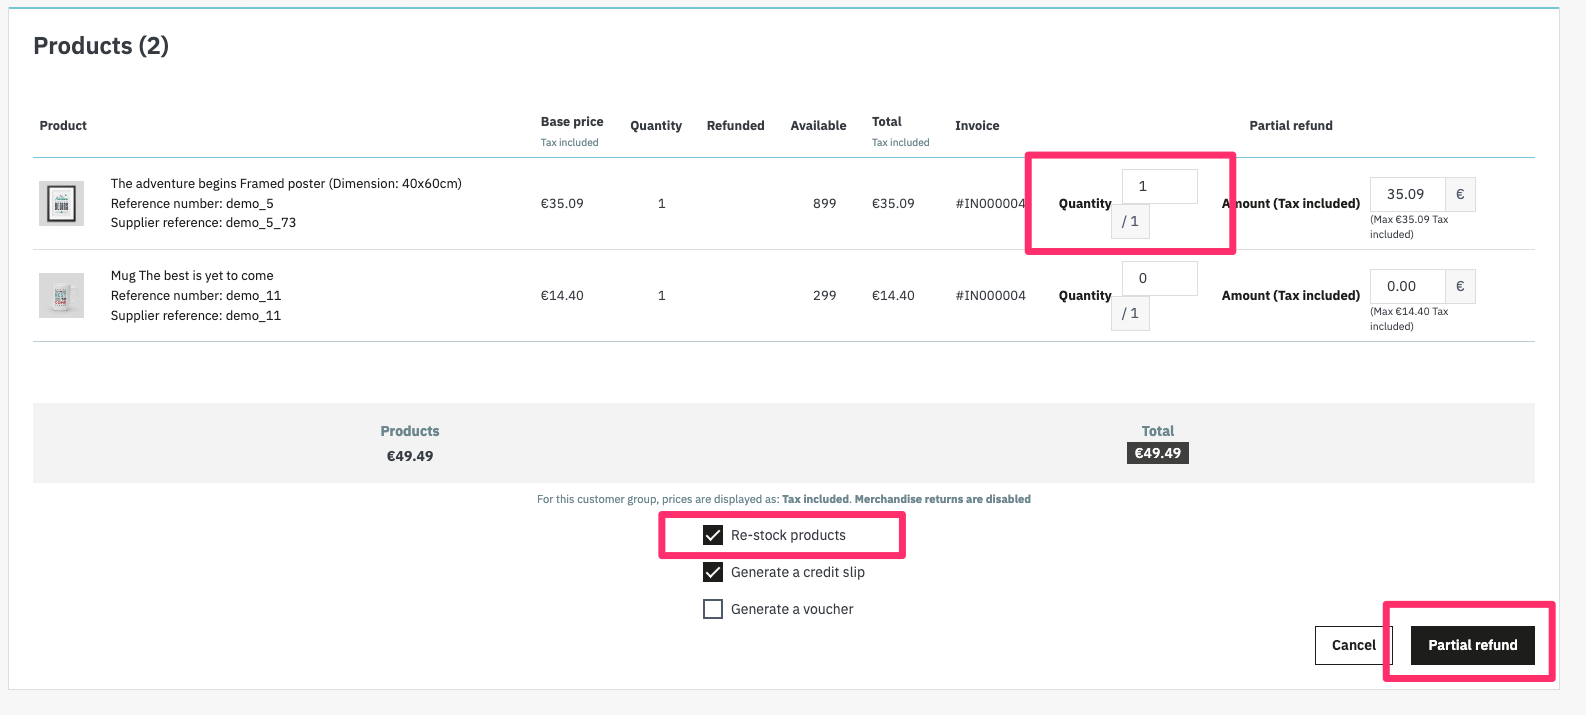
Select the products you would like to refund by using the Quantity field. The amount will automatically be calculated.
-
If you want to restock products, ensure to also select Restock products
-
Click on Partial refund to refund the selected items (please note this action does not require a confirmation!)
-
In case of a partial refund, the leftover amount is shown at the bottom in the Pay. section
Partial refunds are only available for:Prestashop 1.7.8.10 and higher
Prestashop 8 all versions
Capture (BNPL)
When you offer Buy Now Pay Later payment methods in your checkout, the idea is to invoice your customers after they have received their products or services.
Example:
customer places order > transaction status is AUTHORIZED > webshop ships the product(s) > CAPTURE is created
In this plugin, it is possible to automate this flow.
Under Modules > Module Manager > Pay. > Payment methods you will find the Auto-capture settings.
Enabling auto-capture and/or auto-void:
Auto-capture: when enabled, the plugin will automatically send a capture (payment) notification to Pay. when the order status changes to 'Shipped'. This applies to transactions in state AUTHORIZE.
Auto-void: when activated, the plugin will automatically void a transaction in Pay. when the order status is changed to 'Cancelled'. This applies to transactions in the state AUTHORIZE.
Paylink
PrestaShop has their own paylink ability built in so you don't have to use the function we provide.
Here are the steps you have to follow to send such a link to your customer.
- In your PrestaShop backend, go to Orders > Orders > Add new Order
- Search for a customer or Add new customer and prepare the order
- Under Summary > Payment select PAY. in the dropdown box
- Click on More actions > Send pre-filled order to the customer by email
- Close the order, do not click on Create Order or the Paylink will be invalid. And order will be created once the payment has been processed correctly via the paylink
The customer will receive an email with the order and paylink. They can select all the payment methods you have activated in your webshop.
Instore
- Go to Modules > Module Manager > Pay. > Payment methods
- Ensure the payment method PIN is enabled by switching the toggle to active
- In the checkout, a dropdown will appear with a list of available card terminals. The customer can select the relevant one and continue to complete their order by selecting Place order.
- The amount to be paid, will now appear on the selected terminal and the enduser can complete their transaction on the terminal
- Once the payment has been successful, the order will be placed as normal
Business Orders
Certain payment methods, like Biller, can only be used with B2B orders. We recommend enabling the following settings if you are processing B2B orders:
Show Company Name/COC number
- Go to Customers > Addresses
- At the bottom of the page, select Set required fields for this selection
- Select at the very least Company and click Save to save your settings
- In the checkout, the Company name field is now a required field (under Addresses)
Payment method businesses only
- Go to Modules > Modules Manager -> Payments > Pay. and click on Configure
- Navigate to the relevant payment method, for example Biller, and open up this section by clicking the down arrow 'v'
- Set Costumer type to Businesses only
- Save the settings by clicking Save
PrestaShop checks whether the Company field has been filled in, under Addresses. If this field is filled in, it will be considered a Business order. This field is not the same as the Company field under Personal information.
Givacard logo
It is possible to add your own logo for Givacard in your PrestaShop checkout. We advise a format of 50 x 50px for the image.
To set an alternative logo:
- Go to Modules > Modules Manager -> Payments > Pay. and click on Configure
- Go to payment method Givacard and open the settings by clicking the down arrow 'v'
- Enter the URL of your image in the field External logo
- Save your settings by selecting the Save button
Translations
You can manage the payment method name, description and translations yourself in Prestashop.
- Go to Modules > Modules Manager -> Payments > Pay. and click on Configure > click on the relevant payment method to show all available options
- If you have multiple languages installed, you will see
Translations ⌄under Name and Description - Click on Translations
- You will now see all available languages to translate, update these as you wish
Multicore
To limit the impact of a Single Point of Failure (SPOF), we make it possible to use multiple cores in our Prestashop plugin. We will explain here how:
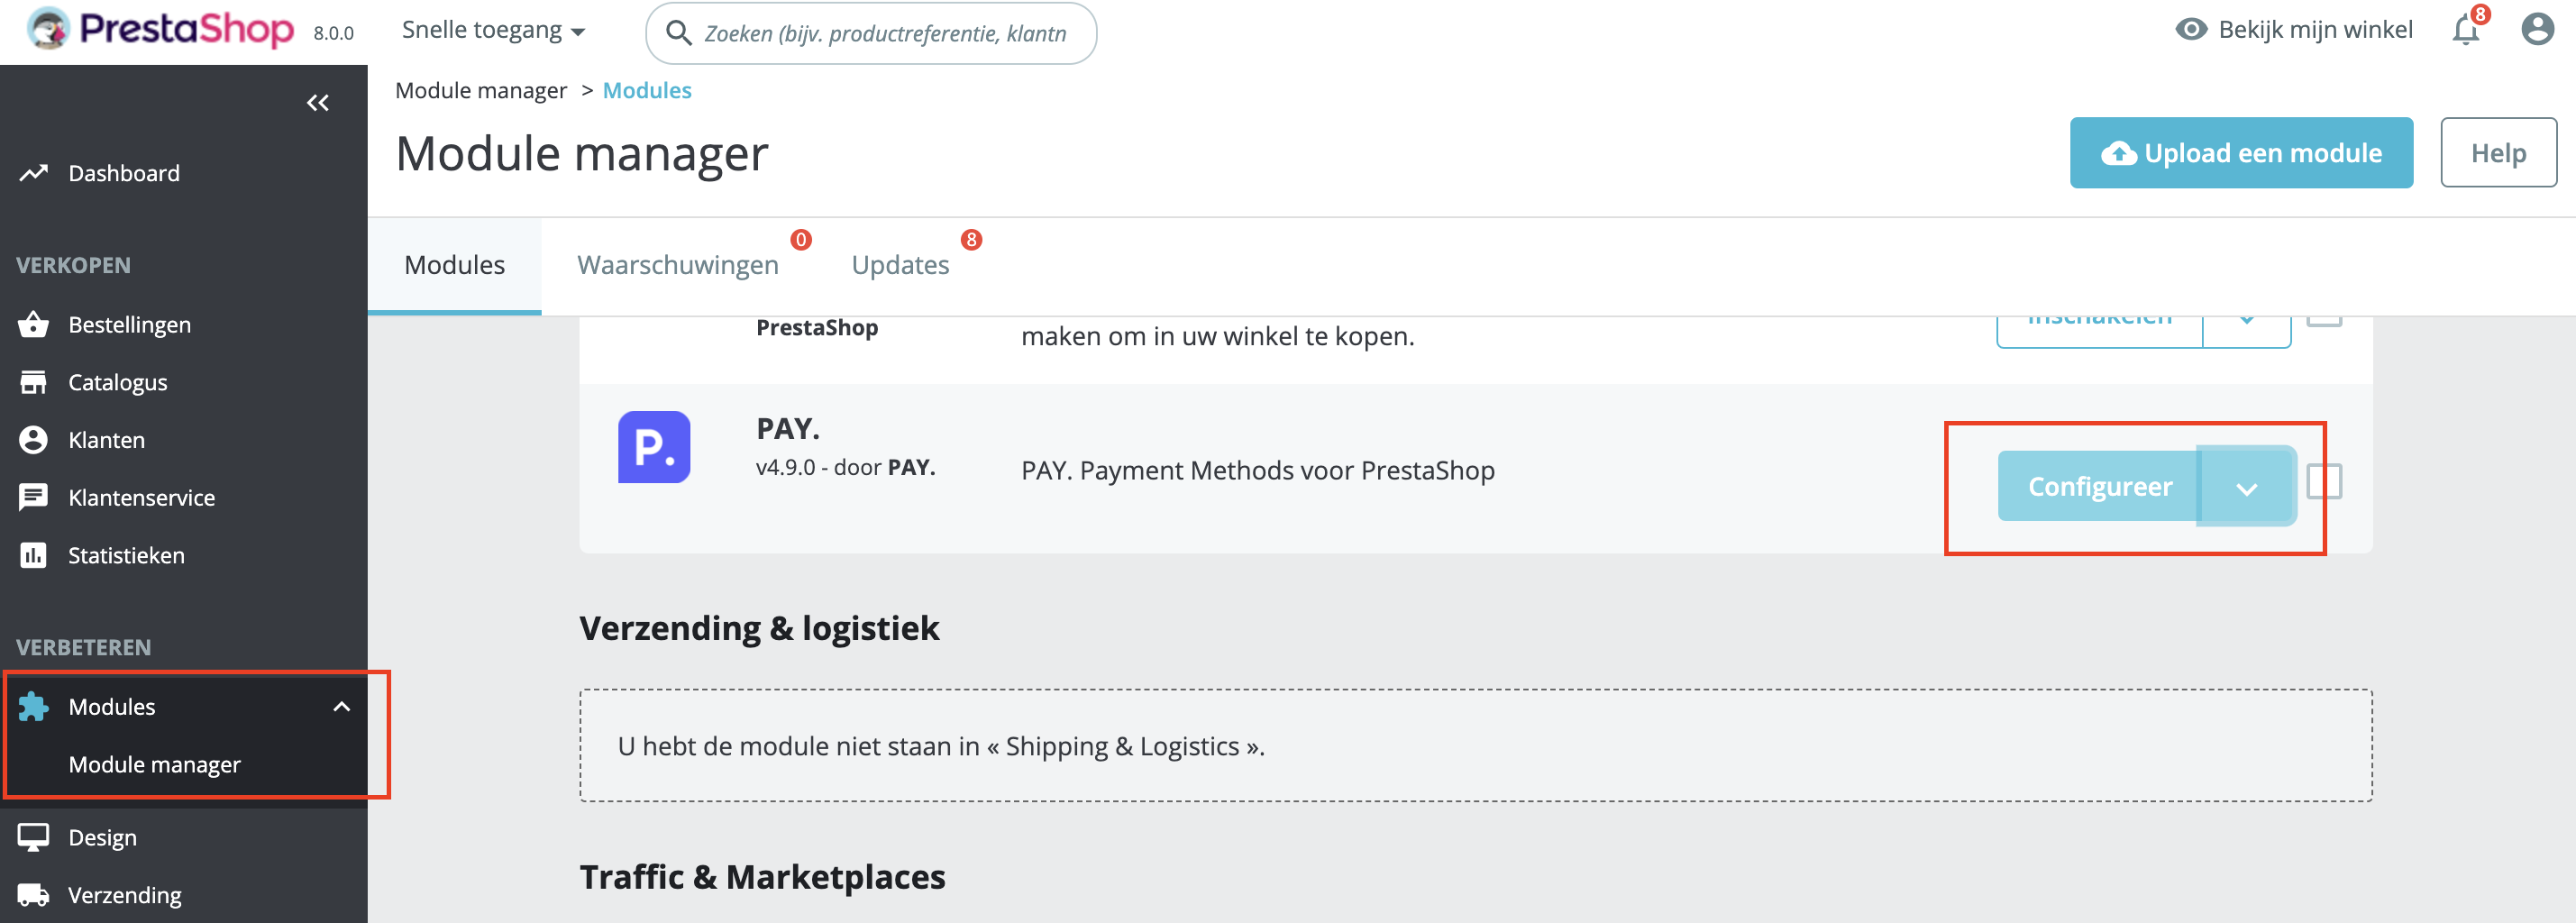
- In your Prestashop admin, go to Modules > Module Manager > Configure
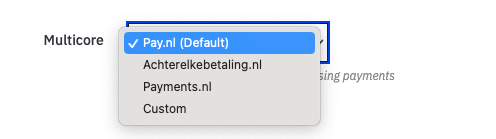
- Next to Multicore you will see a dropdown. Choose between:
- Pay.nl (Default) - this is the GMS API (rest-api.pay.nl) and is selected by default
- Achterelkebetaling.nl - this is a TGU and can be used when the GMS is unavailable
- Payments.nl - this is a TGU and can be used when the GMS is unavailable
- Custom - set your own URL, in the format https://customgateway.nl
NB: the alternative cores can be used for starting transactions and retrieving their status only.
- Click Save to save your changes
Head to the plugin:
And look out for this option, simply select an option from the dropdown menu:
The idea behind the multicore is that your transaction processing is never interrupted. The multicore is, therefor, available for the endpoints transaction::start and transaction::info/status only. Non-essential processes (like the getService, refunds etc.) can continue once any disruptions have cleared.
Payment method settings
It is possible to change a few settings via Modules > Modules Manager -> Payments > Pay. and click on Configure:
- Enable/disable: if the toggle is activated (to the right) payment method is active and shown in checkout. Leave it disabled (toggle left), and the payment method will be disabled and therefor not show in the checkout.
- Name: name as shown in checkout
- Description: description as shown in checkout. You can include instructions here, for example for bank transfer.
- Minimum/maximum amount: select the minimum and/or maximum order total to offer this payment method
- Limit countries: when activated, you can select in which countries you would like the payment method to be available
- Limit carriers: when activated, you can select for which carriers this payment method should be available
- Use fee as percentage / value of fee: when activated, you can enter a percentage that should be charged extra for using this payment method. Please note that a Surcharge is not always allowed.
- Customer type: select for which customer type you would like this payment method to be available
- Order create:
- Create order on succes (default) - Order is created when the payment has been received (new_ptt) or when it is in the status authorise
- Create order on payment start - Order is added to Prestashop when a transaction is started, for example with PayPal. NB: this means an order can be cancelled at a later stage (for example when PayPal rejects the payment)
- Bank selection (iDEAL only): selectbox (dropdown with names only) or radio buttons (names + logos)
Updated about 1 year ago