
Gateway redirect
Introduction
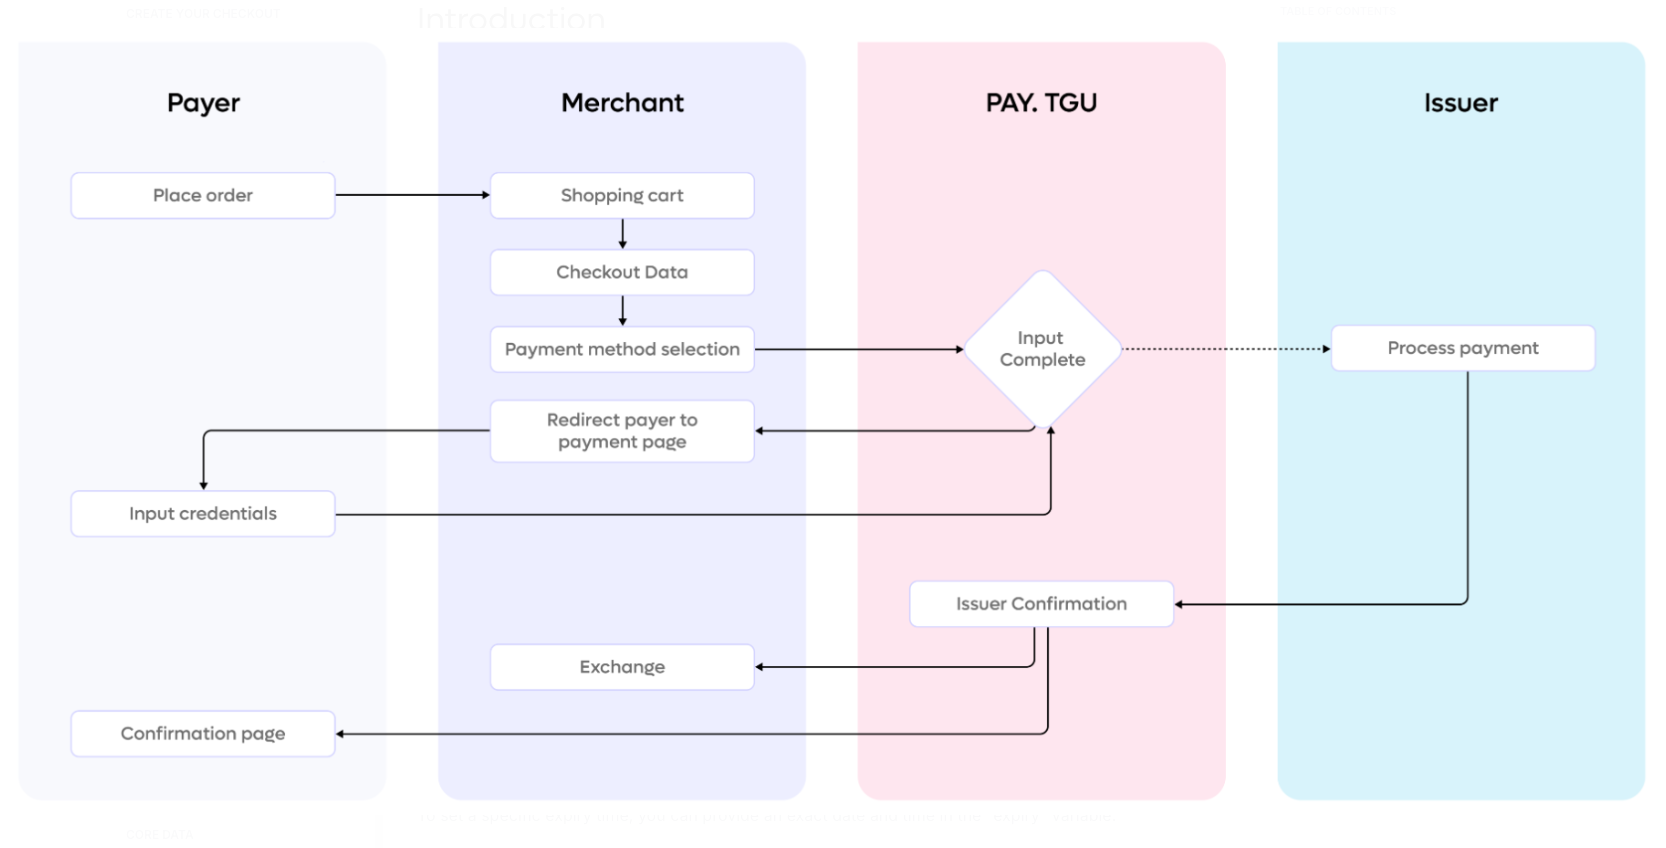
The gateway redirect flow is a traditional payment processing method where the payer is sent to a Hosted Payment Page where they select their payment method and finalise their transaction. This approach allows for secure online transactions through the payer’s bank or payment provider, ensuring that all necessary details are provided directly by the payer for a seamless transaction.
Full supportThis is the most available payment flow and is available for all payment methods
How It Works
In the Standard Payment Flow, the transaction involves the following steps:
-
Checkout Initiation: The payer places an order and provides the checkout data. The payer selects their preferred payment method during the checkout process on the merchant’s website or app or the payer selects the preferred method at Pay's hosted payment page.
-
Provider Selection: The payer is redirected to a payment page where they choose their bank or payment provider from a list of participating institutions.
-
Information Entry: The payer is prompted to log in to their online banking or payment account and confirm the payment. The necessary information includes:
- Personal Information: Some details might be auto-filled based on their account profile.
- Payment Information: Payment amount and transaction reference provided by the merchant.
-
Authorization: The payer authorizes the payment within their online banking or payment environment.
-
Transaction Completion: The bank or payment provider processes the transaction and a status update to Pay that gets processed. At this point the payer is sent to a final screen often showing a "Successful payment" message.
-
Payment Exchange: The processed status is sent to the
Exchange Urlat which point the merchant can manage the data of the payment.
Depending on the status of the payment you can process and run next steps on your end.
Click on the recipe below to get more detailed information regarding the Gateway Redirect Flow
Expire moment
The Expire Moment is the specific time in the future when a transaction will be marked as expired. This is particularly relevant for Gateway Redirect Payments. You can specify the expire moment using different methods.
DateTime Expiring
To set a specific expiry time, you can provide an exact date and time in the "expiry" variable:
| Method | Example | Description |
|---|---|---|
| With Timezone | 2024-08-26T09:52:22+02:00 | Includes the timezone (e.g., CEST) |
| Without Timezone | 2024-08-26 09:52:22 | Default timezone (e.g., CEST) |
Example request:
{
  "amount": {
    "value": 2350
  },
  "serviceId": "SL-1234-1234",
  "description": "iDEAL + ING Order",
  "reference": "REF1234",
  "expire": "2024-12-23T01:00:00"
}
Interval Expiring
Alternatively, you can specify an expiry time as an offset from the moment the order is created.
| Description | Example |
|---|---|
| +30 minutes | Expires 30 minutes after the order is created. |
| +1 minute | Expires 1 minute after the order is created. |
| +1 day | Expires 1 day after the order is created. |
| +5 days | Expires 5 days after the order is created. |
| +120 seconds | Expires 120 seconds (3 minutes) after the order is created. |
Example request:
{
  "amount": {
    "value": 2350
  },
  "serviceId": "SL-1234-1234",
  "description": "iDEAL + ING Order",
  "reference": "REF1234",
  "expire": "+30 minutes"
}'
Expiry and Transaction processingWhile we take precautions to prevent payments after the expiry moment, there is no absolute guarantee. Payments may still be processed after the expiry time due to manual bank transfers or if a cardholder completes a payment immediately after the expiry time. In rare cases, an expired transaction might still be marked as PAID.