
Magento2
In this section we will explain the steps needed to connect your account to Magento2.
Information
Summary | |
|---|---|
Available payment methods | All (online & instore) |
Name | |
Download location | |
Installation | Composer |
Refunds | Via Magento backoffice |
Multi-store | Yes |
Instore | Yes |
Payment filters | Min/max amount | country | B2B/B2C |
New payment options | Plugin update + reload configuration |
Magento2 is one of our actively supported plugins. All (new) payment methods are available via this integration. Missing anything? Contact us!
Set-up
Installation
You can install and update the Pay. Plugin for Magento 2 via the command line tool Composer.
# Install the Pay. Plugin for Magento 2 via Composer
$ composer require paynl/magento2-plugin
$ php bin/magento setup:upgrade
$ php bin/magento cache:clean
How to update your plugin?
With each update, we recommend updating both the Magento plugin version and the SDK.
Minor- and patch releases
Using the composer update command, you can update to the latest minor/patch release.
(E.g.: 1.6.0 -> 1.7.5)
# Update the PAY. Plugin for Magento 2 via Composer to the latest minor/patch release.
$ composer update paynl/magento2-plugin
$ php bin/magento setup:upgrade
$ php bin/magento cache:clean
Major releases
Using the composer require command, you can update the PAY. Plugin for Magento 2 to the latest major release.
(E.g.: 1.6.0 -> 2.8.0)
# Update the PAY. Plugin for Magento 2 via Composer to the latest major release.
$ composer require paynl/magento2-plugin
$ php bin/magento setup:upgrade
$ php bin/magento cache:clean
SDK
Using the composer update command, you can update the SDK to the latest version. If you are already using the latest version, this command will be ignored.
# Update the PAY. SDK for Magento 2 via Composer
$ composer update paynl/magento2-plugin paynl/sdk
$ php bin/magento setup:upgrade
$ php bin/magento cache:clean
Configuration
After the composer installation is complete, open your Magento2 backoffice. Have your credentials ready.
- Go to Stores > Configuration > Pay. > Setup
- Fill in the following details:
- Tokencode (AT-xxxx-xxxx)
- API-token (a3e314ee...)
- ServiceId ((SL-xxxx-xxxx))
- Select Save Config to save your configuration
- You can now enable individual payment methods via Pay.> Payment methods
- Select Save Config to save your changes
Additional plugin settings
You will see 3 menu's:
- Setup: use this menu to connect your payment account and disable/enable testmode
- Payment Methods: tweak the settings of individual payment methods. Also refer to:
- Settings: further settings for auto-capture/void, default payment method, Google Analytics, download logs etc.
Connection (under Set-up)
If the connection is successful, the status will show "Pay. Successfully connected". If you do not see this message, check your credentials (make sure you are using the API token, not the secret).
Auto-capture (under Settings)
Enabled this option, to automatically Capture payments with status AUTHORIZE. The order will be captured when a shipment is created. Captures via Picqer are also supported from version 2.0.1 and above.
If you are using Wuunder or Sherpa, please select the appropriate option.
Pay. Style checkout
Select whether you want Pay. style applied to your checkout.
Failover gateway
Backup gateway, leave this empty unless advised otherwise by Pay.
Custom Exchange URL
Possibility to add a custom exchange URL for testing purposes. Easy when you are using an environment that Pay. cannot reach, for example a local staging environment. Example: https://www.yourdomain.nl/exchange_handler?action=#action#&order_id=#order_id#
You have now successfully connected your Pay. account to Magento
Releases
Features
Refunds
If you wish to make a refund from your webshop, follow these steps:
- Go to Sales > Invoices
- Select the order you would like to refund by selecting View
- Select the Credit Memo tab
- Scroll down to the Refunds Totals section and click on Refund
More details
Refund button
Ensure to hit the Refund button (not Refund Offline).
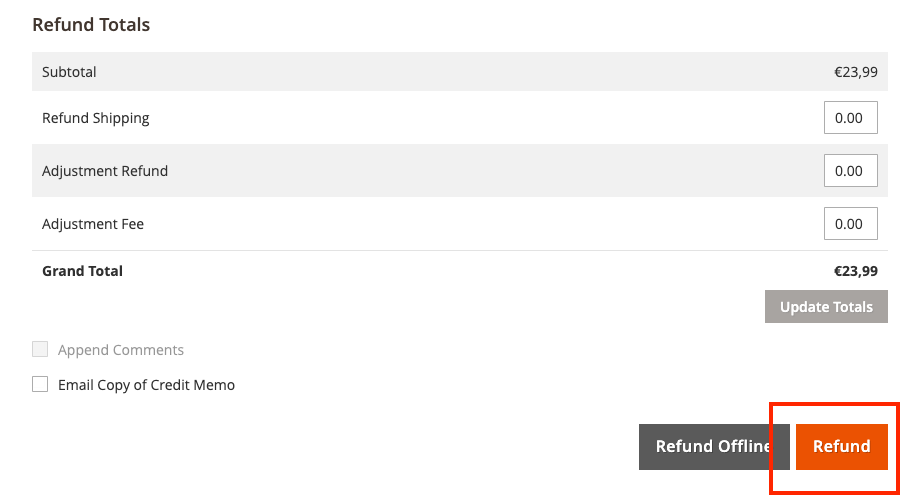
Full and partial refunds
You can process both full and partial refunds.
If successfully added, you will see the refund in Order Notes ("Refund of[€] created. Transaction ID: ...").

Capture (BNPL)
When you offer Buy Now Pay Later payment methods in your checkout, the idea is to invoice your customers after they have received their products or services.
Example:
customer places order > transaction status is AUTHORIZED > webshop ships the product(s) > CAPTURE is created
In this plugin, it is possible to automate this flow.
Under Stores > Configuration > Pay. > Settings > General Settings you will find the Auto Capture settings.
Choose one of the following:
- Off > no auto-capture
- On > transactions that have the status AUTHORIZED will be captured when a shipment is created in Magento (including via Picqer)
- On - via Wuunder
- On - via Sherpa
Paylink
To send payment links, the order will have to be created in the backoffice. A customer will not be able to select this payment option themselves in the checkout.
Enable Paylinks in Magento
- Go to Stores > Configuration > Sales > Payment methods
- Search for Paylink and set Enabled to Yes
Add paylink to order
- Now you have the payment option enabled. You can create an order by going to Sales > Orders
- Click on Create New Order
- Create an order for a new or existing customer. Make sure to add products to the order, otherwise the payment option will not show.
- On the bottom of the page, you can select Pay. Paylink under "Payment & Shipping information"
- Finish your order and select Submit Order
- The paylink will automatically be sent to the customer's email
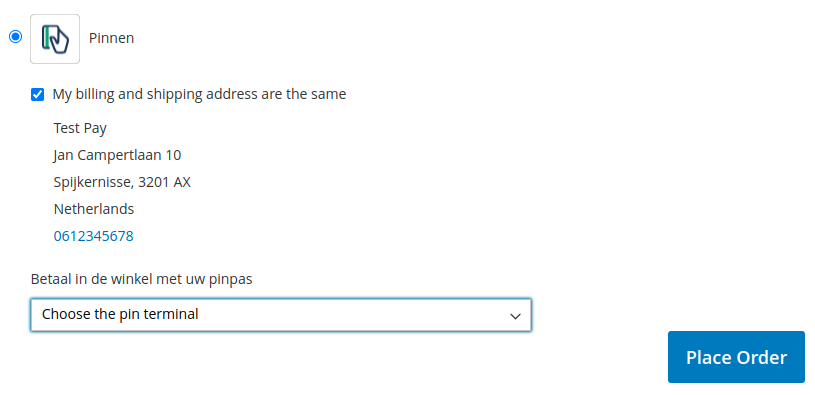
Instore
- Go to Stores > Configuration > Sales > Payment methods
- Search for Instore(PIN) and make sure Enabled is set to Yes
- In the checkout, your customer can now select "Instore" as a payment method. This payment method will show a dropdown of available card terminals that the customer can complete their purchase on.
How to start instore transaction in checkout
- Go to your webshop and add products to your cart
- Continue the normal checkout process
- In the checkout, select payment option Pinnen
- Select the card terminal you want to use for this transaction
- Select Place Order
- The customer is able to finish the transaction on the card terminal
Surcharge
Surcharge is no longer possible in our Magento plugin. We can however recommend alternatives. Always make sure to try the demo and fully test the extension to make sure it fits your requirements:
- Fooman surcharge payment
- Magento 2 extra fee
- Magento extension payment surcharge
- Magento 2 surcharge
- Magento 2 payment fee
Google Analytics
Ensure you have activated Google Analytics in Pay.
In the Magento plugin it is possible to connect your Google Analytics account. This setting in the plugin ensures the gaId is sent with the transaction statistics to increase conversion tracking. It also uses a custom finish URL to prevent double conversions.
Enable Google Analytics in Magento
- Go to Stores > Configuration > Sales > Google API > Google Analytics and activate Google Analytics by setting Enable to Yes and complete your details:
- Account number: account number or tracking number as provided by Google Analytics when creating the account
- Anonymize IP: remove identifiable information from ip-addresses as shown in Google Analytics results
- Enable content experiments: activate Google Content Experiments, which can be used up to 10 different pages.
Enable Google Analytics in the plugin
- Go to Stores > Configuration > Pay. > Settings > Advanced settings and set Google Analytics to Transfer Analytics to Pay.
This setting ensures the Google Analytics client ID is sent in the transaction statistics and a custom finish URL is used to prevent double conversions.
Double conversions?
Check your settings: Ensure the option Transfer analytics to Pay. is activated in the Pay. Magento plugin.
Finish URL: check whether you are redirected to a similar URL as:
https://[webshop].nl/paynl/order/finish/?utm_nooverride=1 after a successful payment


Business Orders
Certain payment methods, like NOTYD (Biller), can only be used with B2B orders. For these payment methods, you can select:
Show payment method only for businesses
- Go to Stores > Configuration > Pay. > Payment methods
- Select the relevant option under Show for Companies:
- Both
- Private only
- Companies only > when placing an order, a customer will have to fill in their Company name along with their address information. Only then the payment option will show.
Show Company name in checkout
You can also choose to let customers enter their company name in the checkout.
-
Go to Stores > Configuration > Pay. > Payment methods > NOTYD
-
Show company field
-
No - don't show company field in checkout
-
Optional - show field and make it optional to complete in checkout
-
Required - show field and make it required to complete in checkout
 3. A company name field will now be shown (or not) in checkout:
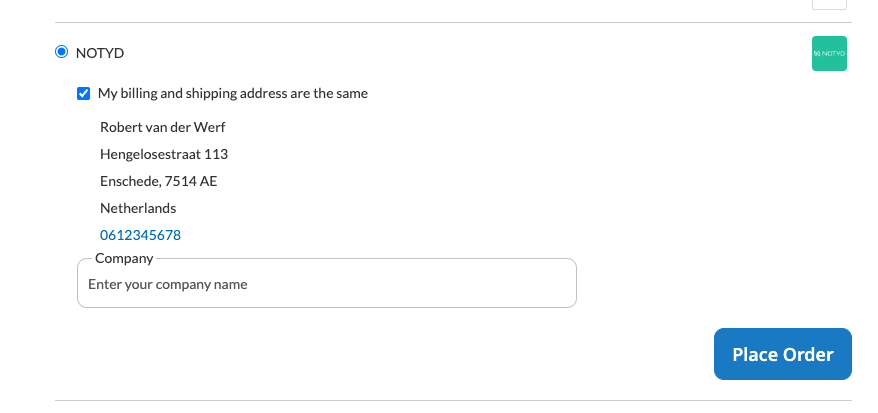
To use this option: please ensure Show for Companies is set to BOTH (otherwise the payment method will not show, unless a company name is provided)
Show COC and/or VAT field in checkout
- Go to Stores > Configuration > Pay. > Payment methods
- Select the relevant option under Show COC field
- No
- Yes, optional
- Yes, required
- Select the relevant option under Show VAT field
- Off
- Optional for B2B customers
- Required for B2B customers
Multishipping
The multishipping module in Magento enables you to ship products to multiple addresses. You can use this module in combination with our Pay. plugin to let your customers pay via iDEAL.
- Install module via Composer by executing the following commands:
$ composer require paynl/magento2-multishipping
$ php bin/magento setup:upgrade
$ php bin/magento cache:clean- Go to Stores > Configuration > Sales > Multishipping Settings > set Allow Shipping to Multiple Addresses to Yes
- In the checkout you should now see the option Checkout with multiple addresses
After installing this module, iDEAL will appear as a payment option in the checkout when Multishipping has been selected. This is only available for B2B customers that are logged into the webshop.
Example
Customers need to view their cart
Checkout with multiple addresses
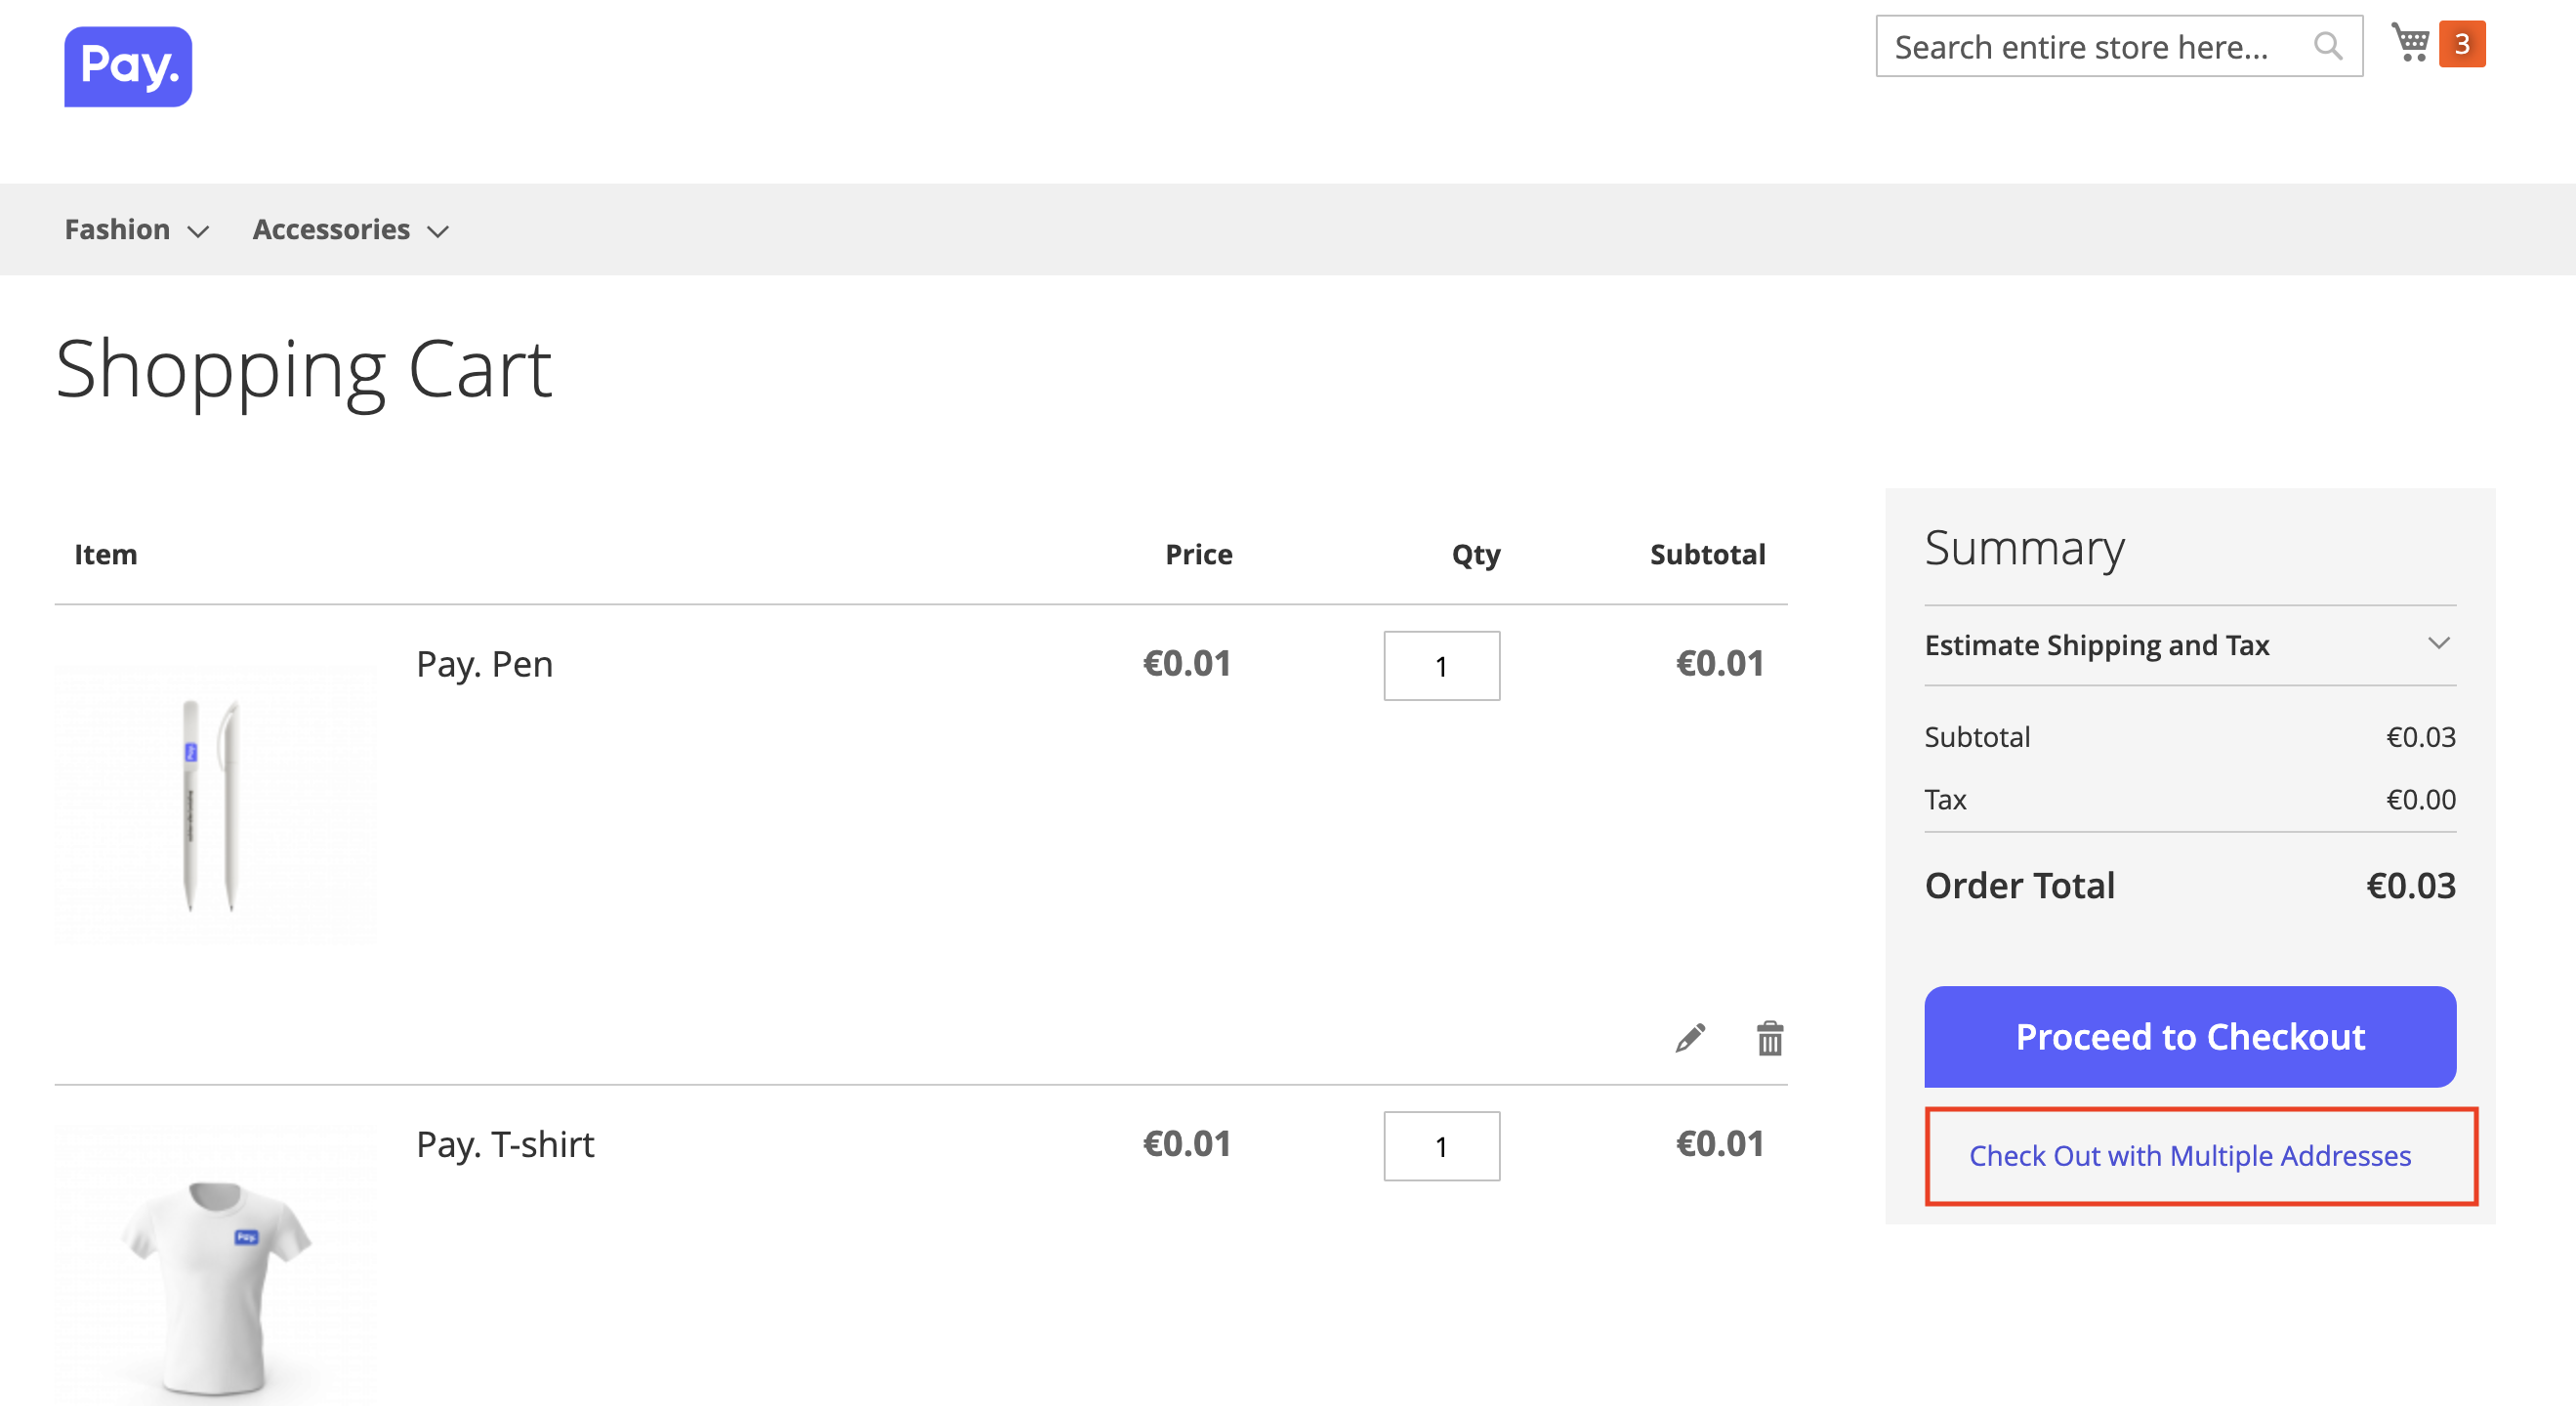
Possible to add multiple addresses
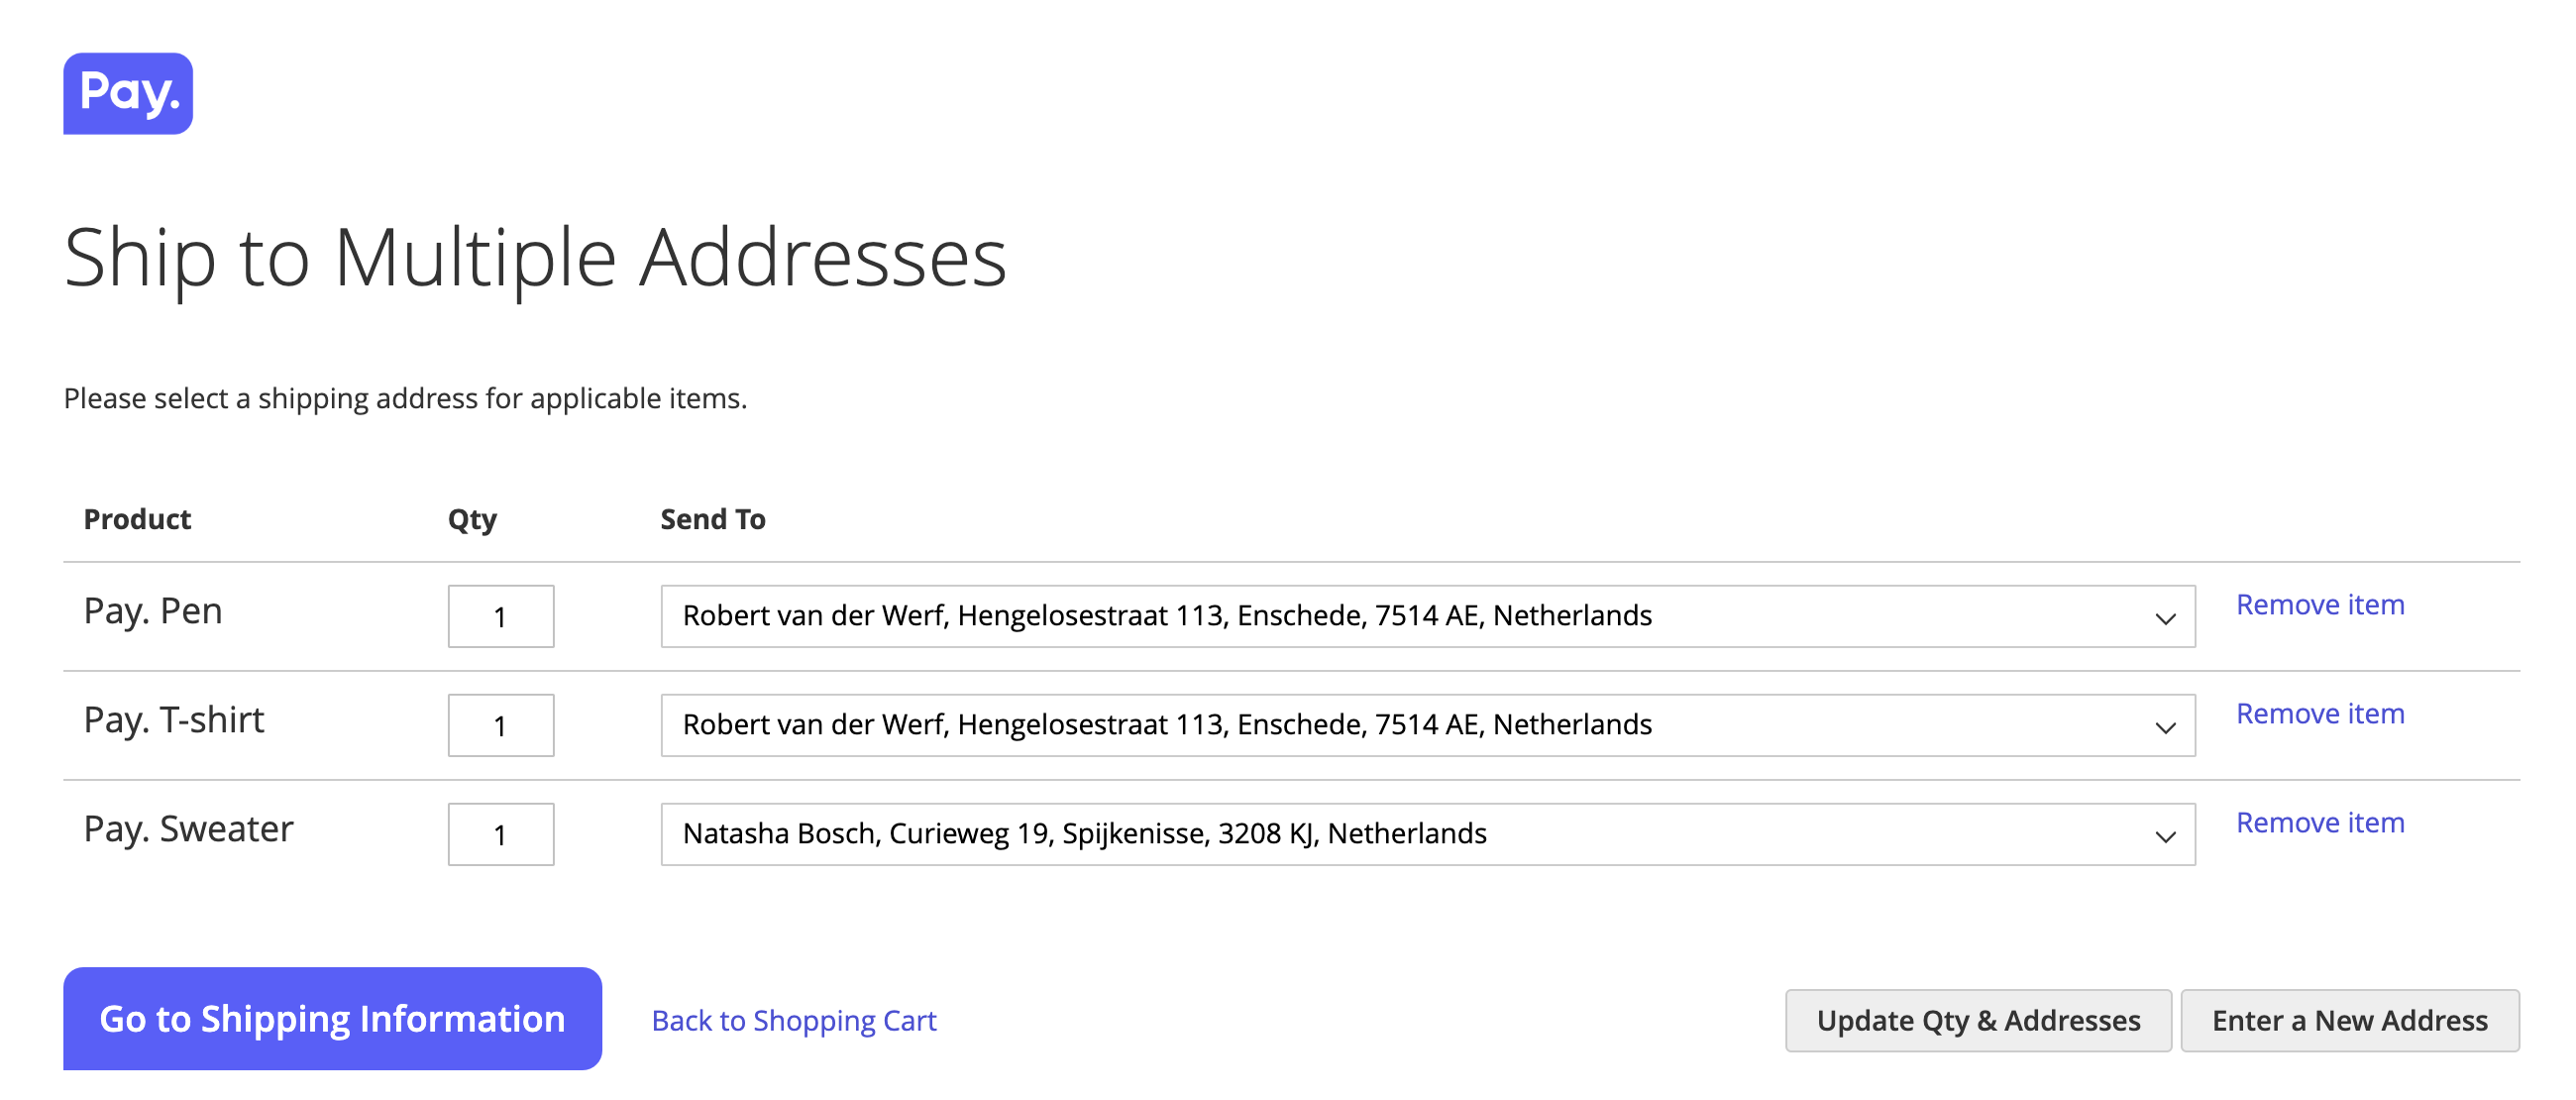
iDEAL is available as a payment method

GraphQL (Headless)
GraphQL is a query language (just like SQL) and is available in Magento2, as an alternative for existing REST and SOAP endpoints
Repository: https://github.com/paynl/magento2-graphql
Samples: https://github.com/paynl/magento2-graphql/wiki
You can install it via Composer:
# Install Pay. GraphQL module
$ composer require paynl/magento2-graphql
$ php bin/magento setup:upgrade
$ php bin/magento cache:clean
What is the Pay. GraphQL module?
Pay. extended their Magento GraphQL integration so you can use the most popular functionalities of Pay. via this protocol. Like starting a transaction and processing refunds.
When can I use this?
You can use this module when you have a headless Magento implementation, where you are probably already using GraphQL, and you want to use payment methods via Pay.
But.. ...headless?
Headless is an implementation form where the backend and frontend are separated. The communication generally takes place via GraphQL.
What is an advantage of headless?
An important advantage is that with GraphQL, you retrieve exactly the data you have requested. That means no excessive data. It also limits the needed web requests. Ideal for mobile applications where data usage and/or bandwidth is limited.
Besides good flexibility, the most important driver behind headless implementations is a better performance.
Translations
You can manage the payment method name, description and translations yourself in Magento.
To change the payment method name and/or description
- Go to Stores > Configuration > Pay. > Payment methods and select the relevant payment method. You can update:
- Title: name as shown in checkout
- Instructions: additional information that is shown once the payment method has been selected in the checkout
To update translations
- Go to Stores > Configuration
- Change the Scope (top left) to switch between stores
- Update the payment method name and/or description for this store (language)
Multicore
To limit the impact of a Single Point of Failure (SPOF), we make it possible to use multiple cores in our Magento2 plugin. We will explain how here:
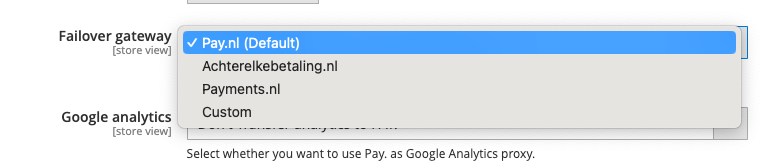
- In your Magento2 admin, go to Stores > Configuration > Pay. > Settings
- Under Advanced Settings you will see a dropdown next to Failover gateway. Choose between:
- Pay.nl (Default) - this is the GMS API (rest-api.pay.nl) and is selected by default
- Achterelkebetaling.nl - this is a TGU and can be used when the GMS is unavailable
- Payments.nl - this is a TGU and can be used when the GMS is unavailable
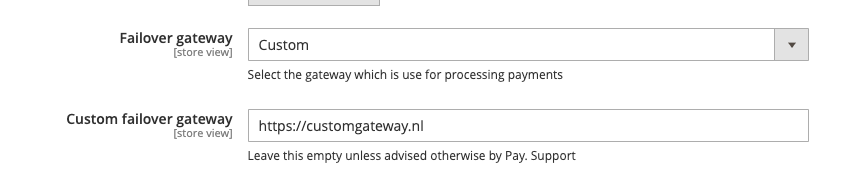
- Custom - set your own URL, in the same format as the example
NB: the alternative cores can be used for starting transactions and retrieving their status only. - Click Save Config to save your changes
Look out for this setting:
The custom setting will show a field to enter your own (custom) failover gateway.
The idea behind the multicore is that your transaction processing is never interrupted. The multicore is, therefor, available for the endpoints transaction::start and transaction::info/status only. Non-essential processes (like the getService, refunds etc.) can continue once any disruptions have cleared.
Error Message Definitions
| Error Code | Description | Possible solution |
|---|---|---|
| PAY-MAGENTO2-001 | PAY. could not authorize this refund (access denied) | Your API token might not have the right to perform a refund. Please check your API permissions or contact PAY. |
| PAY-MAGENTO2-002 | PAY. could not process this refund | The transaction might be already refunded or the refund amount is too high. It could also be that you are trying to refund an instore payment where we do not have the full IBAN number. |
| PAY-MAGENTO2-003 | Failed | PAY. could not capture the order. Check your debug.log to see a detailed error. |
| PAY-MAGENTO2-004 | Failed | Transaction not found. There is no transaction found for the action you are trying to perform. Check whether there is a Pay. transaction involved and/or whether you are trying to capture a transaction that has already been captured. |
| PAY-MAGENTO2-GRAPHQL-VOID-001 | PAY. could not authorize this void | Your API token might not have the right to perform a void. Please check your API permissions or contact PAY. |
| PAY-MAGENTO2-GRAPHQL-VOID-002 | PAY. could not process this void | The transaction might already be voided or have another status that cannot be changed. |
| PAY-MAGENTO2-GRAPHQL-CAPTURE-001 | PAY. could not authorize this capture | Your API token might not have the right to perform a capture. Please check your API permissions or contact PAY. |
| PAY-MAGENTO2-GRAPHQL-CAPTURE-002 | PAY. could not process this capture | The transaction might already be captured or have another status that cannot be changed. |
| PAY-MAGENTO2-GRAPHQL-REFUND-001 | PAY. could not authorize this refund | Your API token might not have the right to perform a refund. Please check your API permissions or contact PAY. |
| PAY-MAGENTO2-GRAPHQL-REFUND-002 | PAY. could not process this refund | The transaction might already be refunded or the refund amount is too high. It could also be that you are trying to refund an instore payment where we do not have the full IBAN number. |
Payment method settings
If you are unable to enable a payment method, please check it is enabled and fully boarded in your sales location. Certain payment methods, like credit cards, may take longer before activated. The following settings are available:
- Enabled: yes is active and shown in checkout, no is not active and not shown in checkout
- Title: name of the payment method in checkout
- Select default terminal (instore only): select a default card terminal or let the customer select a terminal themselves in the checkout via a dropdown list
- New/Authorized/Paid Order status: select the required status
- Payment from applicable countries: select in which countries you would like the payment method to be available
- Instructions: instructions on how to use the payment method, these are shown in checkout
- Show COC field (select payment methods only): show a field in the checkout to enter a Chamber of Commerce number. This field can be: no (not shown), yes optional to complete, yes required to complete
- Show VAT field (select payment methods only): show a field in the checkout to enter a VAT number. This field can be: off (not shown), optional for business customers, required for business customers
- Show Date of Birth field (select payment methods only): a date of birth is required for Buy Now Pay Later payment methods. Optimise the checkout experience for customers using Buy Now Pay Later payment methods by showing this field in the checkout. You can choose: no (not shown), yes optional, yes required
- Show bank selection (iDEAL only): off (customers will be redirected to the bank page to select their bank), as list (names only) or radio buttons (names + logos)
- Minimum/Maximum Order Total: select the minimum and/or maximum order total to offer this payment method
- Sort Order: decide the order of your payment methods in the checkout. Number 1 will be at the to
- Send new order email: select whether to send an order email before or after payment
- Only available with IP-address (instore only): decide to only show the instore payment method from a kiosk (for example). Add a comma between ip addresses for multiple inputs
- Only available with useragent (instore only): specify a useragent to make instore only available to a certain browser. Or select custom to add your own useragent
- Disallowed Shipping Methods: disable certain shipping methods for a payment method. For example: do not show Credit Card when a customer has selected free-shipping
- Show for companies: select whether to show the payment method for companies yes or no
- Customer Group: select for which customer group you would like this payment method to be available
- Turn off invoice for B2B: disable the generation of invoices for B2B customers when using Buy now, Pay later methods. Select yes or no.
FAQ
How do I activate a new payment method?
All payment methods are already pre-loaded into Magento. Simply activate the payment methods you wish to use, in your sales location in My.Pay.
You can see either:
- Not active, activate on My.pay.nl first > which means the payment method has not yet been activated in your sales location. Do this first.

- No > which means the payment method is activated in your sales location, but not activated in Magento (so it will not show in the frontend). Simply change this to Yes to show the payment method in your checkout.

How do I change the name of a payment method?
- Go to Stores > Configuration > Sales > Pay. > Payment methods
- Click on the relevant payment method
- Change the Title as you wish
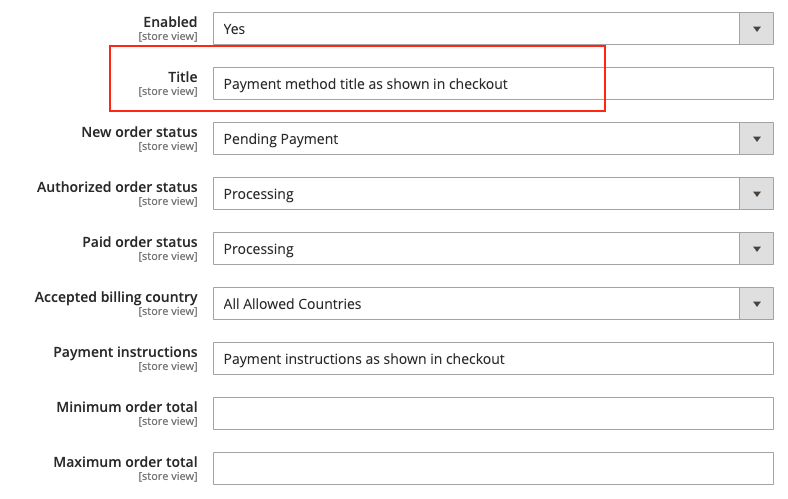
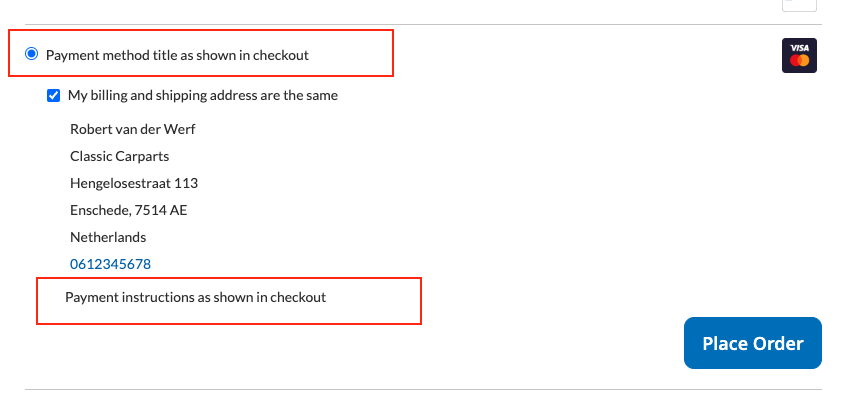
- You can also add payment instructions that will be shown in checkout
Example:
Can I change the payment method logo?
No, it is not a standard functionality in the plugin or in the Magento platform to update the logo. However, it is possible to achieve this with some custom work which you can do yourself or with the help of a webdeveloper. Please note we cannot provide support on custom work.
Updated 12 months ago